

Potato (Solanum tuberosum L.) is the world; most important vegetable crop, capable of ensuring food security in the face of mounting demand. With 381 million tons produced annually, it is the world fourth most important food crop, after wheat (729 million tons), rice (741 million tons), and corn (1037 million tons), (Ruan et al, 2021), but ranks first among the non-cereal crops. Potato is a wholesome food in terms of its high nutritive value, energy, dry matter per unit area and time compared to cereals and its capacity to ensure food and nutritional security of the world.
The cultivation area available for potato across India during the fiscal year 2023 is estimated to have amounted to approximately 2.35 million hectares. In the fiscal year 2023, the volume of potato produced across India was estimated to be around 59.74 million metric tons. This was an increase of over three million metric tons from the previous fiscal year. The majority of the Indian potatoes came from the northern state of Uttar Pradesh.
Potato is one of the most important crops of Assam occupying 1,03,812 ha producing 6,94,002 tons with an average yield of 66.85 q/ha. As compared to the national average, the productivity is far below, and many causes can be attributed to this dismal performance of the crop. Among them, non-availability of quality seed tubers of high-yielding improved varieties is the most important one. Use of low inputs, lack of irrigation facilities, incidence of pests and diseases, especially late blight are the challenges faced by the potato farmers of the state. So far as the land suitability is concerned, the crop is grown in a variety of soil right from clay loam to sandy loam soils of the Brahmaputra valley where the majority of the soil falls in acidic range. Generally, it is seen that potatoes are cultivated in two land situations, viz, upland situation (mainly after summer/kharif vegetables) and medium lowland to lowland situation (in post sali (winter rice) areas. Since the planting window of the crop is short (Mid Oct to Mid Nov) farmers must prepare and plant the crop within a short period of time. But in post-rice situation, i.e. after harvesting of kharif paddy planting delays up to mid-December in many places. This has created a reduction of potato productivity. This is more pronounced in areas where long-duration rice varieties like Ranjit, Ranjit Sub-1, Bahadur, Bahadur Sub-1, Gitesh are grown. Few alterations in the selection of medium-duration (130 days) varieties in such areas with varieties like, Numoli, Dholi, Shraboni, etc may give some time to make an advance in planting time in post-rice situation. For this purpose, awareness, training, and supply of medium-duration varieties to farmers may be taken up. The use of machines (mechanization) is an important intervention, especially in rice harvesting and land preparation for the second crop (potato) will give added advantage to the farmers. Considering this aspect extension strategies may be initiated.
Potatoes are the best source of carbohydrate content (approximately 26 grams). The predominant form of this carbohydrate is starch. A small but significant portion of this starch is resistant to digestion by enzymes in the stomach and small intestine, and so reaches the large intestine essentially intact. This resistant starch is considered to have similar physiological effects and health benefits as fiber: it provides bulk, offers protection against colon cancer, improves glucose tolerance and insulin sensitivity, lowers plasma cholesterol and triglyceride concentrations, increases satiety, and possibly even reduces fat storage.
The amount of resistant starch in potatoes depends much on preparation methods. Cooking and then cooling potatoes significantly increases resistant starch. For example, cooked potato starch contains about 7% resistant starch, which increases to about 13% upon cooling.
Potatoes contain vitamins and minerals that have been identified as vital to human nutrition. Humans can subsist healthily on a diet of potatoes and milk; the latter supplies Vitamin A and Vitamin D. A medium potato (150g) with the skin provides 27 mg of vitamin C (45% of the Daily Value (DV)), 620 mg of potassium (18% of DV), 0.2 mg vitamin B6 (10% of DV) and trace amounts of thiamin, riboflavin, folate, niacin, magnesium, phosphorus, iron, and zinc. Moreover, the fiber content of a potato with skin (2 grams) equals that of many whole grain breads, pastas, and cereals. Potatoes also contain an assortment of phytochemicals, such as carotenoids and polyphenols. The notion that “all of the potato’s nutrients” are found in the skin is an urban legend. While the skin does contain approximately half of the total dietary fiber, more than 50% of the nutrients are found within the potato itself. The cooking method used can significantly impact the nutrient availability of the potato.
Almost all the protein content of a potato is contained in a thin layer just under its skin. This is evident when the skin of a boiled potato is carefully peeled; it appears as a yellowish film. For maximum utilization of this small, but valuable dietary source of protein, potatoes should be consumed whole, or peeled after cooking.
Potatoes are often broadly classified as high on the glycemic index (GI) and so are often excluded from the diets of individuals trying to follow a “low GI” eating regimen. In fact, the GI of potatoes can vary considerably depending on type, origin (where it was grown), preparation methods (i.e., cooking method, whether it is eaten hot or cold, whether it is mashed or cubed or consumed whole, etc), and with what it is consumed.
Total area of potato in India is 2203000 Ha (2020-21) and production is 56173000 Tonne (2020-21)
Potato is a temperate climate crop; however, it grows under a diverse range of climatic conditions. It is grown only under such conditions where the temperature during the growing seasons is moderately cool. The vegetative growth of the plant is best at a temperature of 24°C while tuber development is favoured at 20°C. Potato seed tubers generally take 10 days to three weeks to sprout depending on the dormancy of seed potatoes and the soil temperature When the temperature rises above 30°C, tubers stop growing This is because of respiratory speed rises with rising body temperature. Photosynthesis-produced carbohydrates are used up during the process rather than being retained in the tubers. Thus, at higher temperatures, tuber development is impacted. The optimal soil temperature for the development of potato tubers is 17-19°C. The ideal conditions for potato growth are chilly nights and bright sunshine during the day.
Potato is grown on a wide range of soil in India Loamy soil, sandy loam, silt loam, clay soil, and other types of soil can all be used to grow potatoes. To reduce resistance to tuber enlargement, the soil should be loose Fertile and well-drained soil are prerequisites for good crop of potato. Acidic soil with a pH range of 4.8 to 5.4 is needed for potato growing The potato is within the category of the cool-weather crop. A pulse crop may preferably be included in rotation to improve the soil condition. This helps in eliminating many soil pest including red ant damage
| Name | Duration (days) | Yield (q/ha) | Plant characters | Tuber characters | Tolerance to diseases | |
|---|---|---|---|---|---|---|
| Rainfed | Irrigated | |||||
| Kufri Chandramukhi | 80-100 | 85-100 | 150-160 | Medium tall, erect | Oval, slightly curved, skin white, eyes flat | Leaf roll & virus Y |
| Kufri Jyoti | 110-120 | 85-100 | 150-160 | Tall, erect | Oval, flat, skin white, eyes flat, flesh dull white | Late blight |
| Kufri Megha | 100-120 | 120-150 | 175-200 | Tall, erect | White round oval tubers of medium size, white eyes, Flesh dull white, good keeping quality & no tuber cracking | Late blight resistant |
| Kufri Pukhraj | 60-75 | 145 | 200-250 | Medium, erect | Easy to cook; Texture-waxy texture; Free from after cooking discoloration | Moderately resistant to Late blight & tolerant to viruses |
| Kufri Khyati | 60-75 | 200-250 | 250-350 | Tall (80-85 CM), erect | Oval, Pale yellow, medium compact, vigorous | Moderately tolerant to Late blight & tolerant to viruses |
Potato variety Kufri Megha can be grown late (up to Mid-December) in Upper Brahmaputra Valley Zone
| Variety | Climatic Zones | Duration | Sowing Time | Seasons | Yield (t/ha) | Salient Features |
|---|---|---|---|---|---|---|
| Kufri Surya | NBPZ, UBVZ, CBVZ, LBVZ, BVZ, HZ | Early | October | Rabi | 25-30 | Tolerant to heat and hopper burn, and suitable for early planting, very good keeping quality |
| Kufri Himalini | NBPZ, LBVZ, BVZ, HZ | Medium | October, November | Rabi | 30-35 | Resistant to late blight, and good yield in both hills & plains |
| Kufri Chipsona-3 | NBPZ, UBVZ, CBVZ, LBVZ | Medium | October, November | Rabi | 30-35 | Resistant to late blight and suitable for chips & French fries |
| Kufri Mohan | NBPZ, CBVZ, LBVZ, BVZ | Early to Medium | October, November | Rabi | 35-40 | High marketable tuber yield, moderately resistant to late blight |
Field should be thoroughly ploughed to obtain a good tilth. It should be leveled for uniform distribution of irrigation water or to maintain soil moisture uniformly under rainfed situation. The furrows should be prepared at 60 cm apart. About 20 cm spacing should be maintained between two tubers in rows.
The sprouted tubers should be planted in furrows with sprouts facing upward. Care should be taken to avoid sprout damage during handling the tubers.
Virus free, healthy, medium-sized sprouted tubers are to be selected for planting. Ideal size is about 2.5 cm in diameter (25-40 g). Bigger-sized tubers may be cut into pieces longitudinally with 2-3 eyes in each piece.
Certified seeds of the recommended varieties are to be procured from Govt. or other recognized agencies.
In case of cut seeds, the pieces are to be dipped in carboxin @ 2g in 1 litre of water for about 10 minutes. After treatment, the seeds are to be spread thinly and dried under shade for 48 hours, or should be covered with moist gunny bags for 2-3 days for tuberization.
The seed requirement is 22.5-25 q/ha when the size of the tubers is about 2.5 cm in diameter (about 25 g) and planted with an intra-row spacing of 15 cm. Intra-row spacing is increased with bigger-sized tubers.
Ten tonnes or 5 truckloads or 20 cart loads of well decomposed FYM should be applied per hectare in the furrows before planting.
| Nutrient | Requirement (kg/ha) | Form | Fertilizer Requirement | |
|---|---|---|---|---|
| kg/ha | kg/bigha | |||
| Rainfed | ||||
| N | 60 | Urea | 133 | 19 |
| P2O5 | 50 | SSP | 312 | 45 |
| K2O | 50 | MOP | 83 | 12 |
| Irrigated | ||||
| N | 120 | Urea | 266 | 38 |
| P2O5 | 100 | SSP | 624 | 90 |
| K2O | 100 | MOP | 168 | 24 |
Entire quantity of fertilizers should be applied in furrows as basal application and be covered with a thin layer of soil so that tubers do not come into direct contact with the fertilizers. The crop booster ‘Green Harvest’ is recommended @ 25 g/10 lit of water at 30 days after planting.
Application of mulching under rain situations increases tuber yield. Generally, water hyacinth is applied to cover the entire field after planting of tubers under the flatbed method. However, the skin of the tubers may turn green due to exposure to sunlight or shrinkage of mulching materials on drying. Tubers become unsuitable for consumption due to greening; however, quantities may be reduced by applying mulching materials in furrows just after planting of tubers, immediately.
The furrow method of irrigation should be adopted. Three irrigations should be applied: first at 25 days (stolon formation stage), second at 60 days (tuber formation stage), and third at 80 days (tuber development stage) after emergence of sprouts. In case of application of mulching materials in furrows, only two irrigations are to be applied at 25 and 60 days after emergence of sprouts. At the time of application of irrigation, care should be taken not to submerge the ridges completely.
Earthing up is to be done just before the first and second irrigation. Under rainfed conditions, this should be done at stolon and tuber formation stages. One or two interculture operations may be necessary when weed infestation is high. Apply metribuzine @ 0.75 kg/ha (100 g/bigha) at 10% plant to get optimum weed control.
Why and where it occurs: Persistent dry weather with lesser or no rainfall, reduced humidity & 16-23°C temperature favor the pests.
How to identify:
Causal organism: Holotrichia spp.
Why and where it occurs: Moist soil, especially with high content of decaying organic matter, favors the availability of the pest.
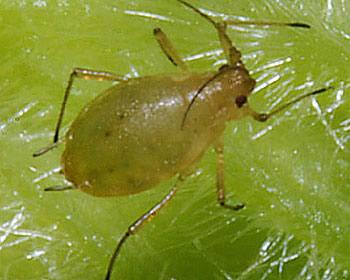
Why and where it occurs: It is the most widely distributed pest of potato in the world. It is usually found in warm climates for overwinter survival and considered a subtropical pest.
How to identify:
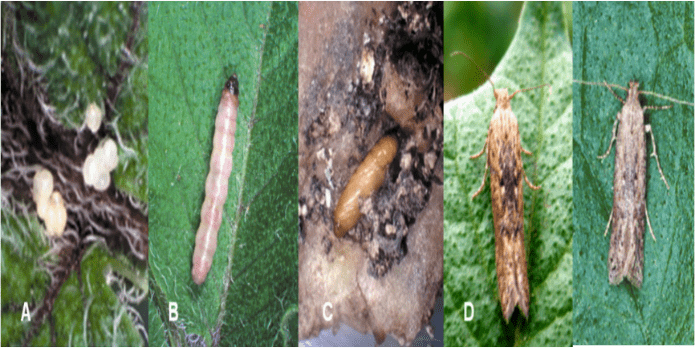
Chemical control:
Causal organism: Myzus persicae
Why and where it occurs: Relative humidity of 66% and 11–14°C temperature are ideal for this pest. Its population sharply decreases with an increase in RH over 73%.
In areas where infestation of red ant and other soil insects are common, application of thiamethoxam 25WG @ 26 g a.i./ha and clothianidin 50 WDG @ 80 g a.i./ha is effective. Application of mustard oil cake @ 150 kg/ha at the time of earthing up reduces red ant and white ant infestation to a great extent.
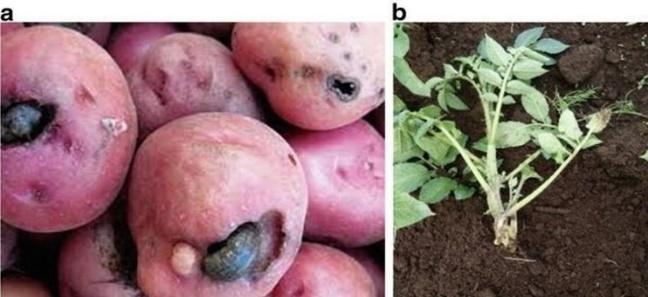
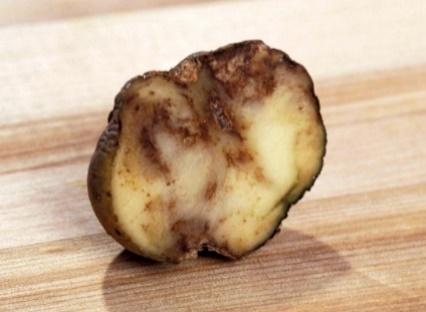
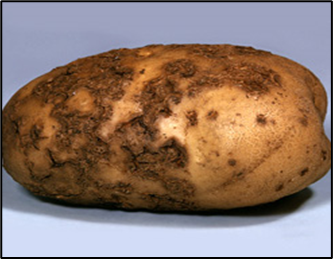
Causal Organism: Phytophthora infestans
Why and where it occurs:
How to identify:
Management
How to identify:

Management
Why and where it occurs:
How to identify:
Management
Transplanted Crop:
Seedlings are transplanted in the field after raising in the nursery. About 70% of the total produce is marketable and the remaining quantity of small-sized tubers is used as seedling materials in subsequent seasons.
Tuberlet Production:
TPS are sown in nursery beds and 70-80% is produced as tuberlets, which are used as planting materials.
Planting of Tuberlet:
Mainly commercial tubers are produced on planting of tuberlets, though tuberlets can be used as planting materials during subsequent years.
| Varieties | Transplanted crops (q/ha) | Tuberlet production from direct seeding (q/ha) | Tuberlets as planting materials (q/ha) |
|---|---|---|---|
| HPS 1/13 | 229 | 265 | 314 |
| HPS 7/67 | 251 | 276 | 282 |
| HPS 11/13 | 220 | 231 | 294 |
| TPS C-3 | 257 | 290 | 308 |
To produce seedling tubers, follow the procedure below:
The seedling tubers produced either by direct seeding of TPS or from the transplanted potato crop are planted in the field in the next season. The method is similar to the recommended conventional cultivation practices of the potato crop, except the spacing according to seed rate and seed size.
| Tuberlet size (g) | Inter-row spacing (cm) | Seed rate (q/ha) |
|---|---|---|
| 20-40 | 20 | 25 |
| 10-20 | 15 | 17 |
| 5-10 | 10 | 12 |
In case of 5g, two tuberlets should be planted. Moreover, seedling tubers (tuberlets) can be used for 3-4 successive years if the seed plot technique is followed appropriately.
Zero- tillage potato cultivation technology means that planting can happen immediately after the paddy harvest, with no land preparation, earthing-up, or digging of the soil at harvest. It conserves soil moisture and extends the days available for potato cultivation to fit in the short window between the two rice seasons and above all does not compromise yield compared to using conventional methods. It also enables farmers to save about 30% on cultivation costs.
Conventionally, farmers wait for about a month after the paddy harvest to prepare land for potato cultivation which further shortens the available window and means the crop faces a delay in planting and harvesting. From February to March the temperature starts to rise which impacts yield and the storability of the crop.
ZTRM allows farmers to eliminate the time required for land preparation and is useful for sowing potatoes within a few days of rice harvesting. Moreover, it is a technology that eliminates the entire cost of land tillage and digging and significantly reduces the costs of inputs and labor (Table 1). It is a quite simple and cost-effective technology for farmers to use and it also means that a long- duration potato variety can fit into the available time window quite easily. Another big advantage of ZTRM is the availability of rice straw after paddy harvest which can be used for potato cultivation rather than burned, creating an additional benefit for both the farmers and the environment.
One of the basic requirements for zero-tillage with rice mulch (ZTRM) is the availability of plenty of soil moisture at the time of planting. Moisture content in Assam soils is high and the evaporation rate is low because of prevailing high humidity. Rice mulch further reduces soil surface evaporation. As a result, in many areas crops can be grown without any irrigation or with one or two very light irrigations.
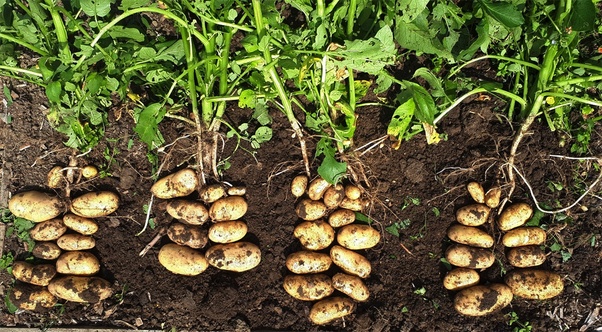
Immediately after the rice harvest, potato crops can be planted as no soil tillage or other preparations are required. Well-sprouted seed tubers are placed directly on the soil in rows at 50 x 25 cm spacing, while farmyard manure is placed on the tubers and chemical fertilizers are placed between the rows of tubers. All chemical fertilizers are applied as a basal dose at the time of planting. After 30 days of plant growth, water-soluble fertilizers and micronutrients are applied as foliar spray (Table 2). Tubers are covered with a 15-20 cm thick layer of paddy straw or 4-5 kg of rice straw/m2. For mulching one bigha of the zero-tillage potato crop, rice straw from 3 bighas can be used. Potato plants come out of the rice straw in 15-20 days and rapidly grow to cover the entire available area. Weed growth is practically nil due to the thick rice mulch. Needs-based chemicals or bio-pesticides are applied. Mulching results in a 90% reduction in cutworm incidence and the onset of late blight is also delayed due to changes in the crop’s microclimate. The crop is harvested after 75 to 90 days by removing the mulch and picking the tubers from the soil surface. Again, no digging of the soil is required – see Images 1, 2, and 3.
| S.No. | Input Cost on Particular | Conventional Potato Crop | Zero-Tillage Potato Crop | Remarks |
|---|---|---|---|---|
| 1 | Rice harvesting | 0 | 0 | Attention required in zero tillage |
| 2 | Field preparational cost | 3200 | 0 | |
| 3 | Sowing of seed potatoes & basal fertilizer application | 2100 | 1200 | |
| 4 | Rice straw mulching | 0 | 900 | Straw management |
| 5 | Weeding and earthing-up 2 times | 800 | 0 | |
| 6 | Irrigation 2 times | 900 | 0 | (Labor - irrigation cost) |
| 7 | Application of fertilizer (split) | 500 | 500 | Foliar application 2-3 times in zero tillage case |
| 8 | Plant protection | 600 | 500 | |
| 9 | Harvesting | 1900 | 1200 | |
| 10 | Seed input 300 kg @32/kg | 9600 | 9600 | |
| 11 | Fertilizers inputs | 3400 | 3200 | |
| 12 | Pesticides inputs | 1000 | 900 | |
| Total cost of cultivation per bigha | 24000 | 18000 | Unpaid family labor costs included | |
| Total cost of cultivation per ha | 180000 | 135000 | ||
| Other benefits | ||||
| Low input cost: labor, fertilizer & pesticides | Best straw management & utilization | 10-15 days early harvesting | Enhance soil fertility and eco-friendly (low carbon credit technology) | |
| S. No. | Particulars | Unit | Quantity (kg) |
|---|---|---|---|
| 1 | Potato seed tubers | kg | 250 |
| 3 | Urea (N12 per bigha) | kg | 25 |
| 4 | SSP (P13 per bigha) | kg | 80 |
| 5 | MOP (K15 per bigha) | kg | 25 |
| 6 | Mustard oil cake | kg | 15 |
| 7 | Farmyard manure (cow dung) | kg | 2500 |
| 8 | Zinc sulfate (21%) | kg | 2 |
| 9 | Boron | kg | 0.5 |
| 10 | Seaweed extract 28% (w/w) growth promoter | kg | 2 |
| 11 | PSB | kg | 0.5 |
| 14 | Magnesium sulfate (foliar spray) (0.5%) | kg | 0.5 |
| 15 | NPK 19:19:19 (foliar spray) (0.5%) | kg | 0.5 |
| 16 | Potassium nitrate 13:0:45 (foliar spray) (0.5%) | kg | 1 |
| 17 | Sulfate of potash 00:00:50 (foliar spray) (0.5%) | kg | 0.5 |
Jorhat, PIN - 785013 Assam